Before any user can register a passkey, you need to enable the authentication methods in Entra, create passkey profiles, and scope them to the right groups.
Where to find it
Passkey configuration lives under:
Entra portal > Protection > Authentication methods
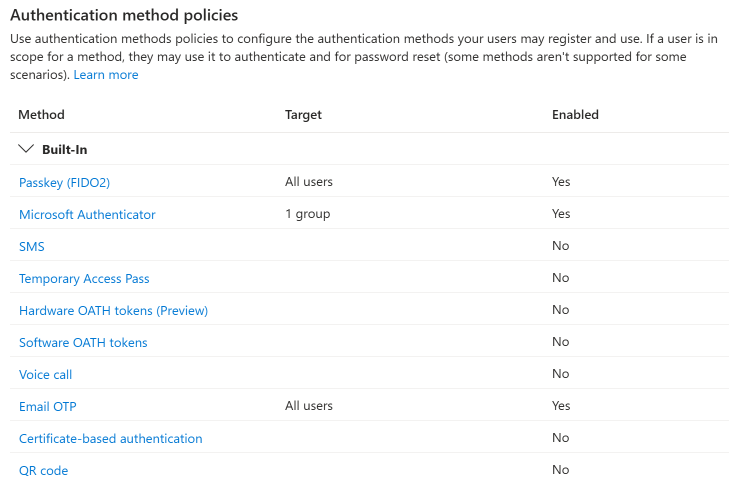
Two methods are relevant for passkeys: Passkey (FIDO2) and Microsoft Authenticator. Windows Hello for Business is configured separately through Intune or Group Policy.
Configuring Passkey (FIDO2)
This is the primary passkey configuration. It has two tabs: Enable and target and Configure.
Configure tab: passkey profiles and self-service
The Configure tab is where you create passkey profiles and enable self-service registration.
- Allow self-service set up - check this to let users register passkeys from My Security Info
- Passkey profiles - up to 3 profiles are supported. The default profile cannot be deleted or renamed. Each profile controls:
- Enforce attestation - whether the authenticator must cryptographically prove its identity at registration. If enabled, the only passkey type available is device-bound. See Attestation and AAGUIDs for details.
- Passkey types - device-bound or synced
- Target specific AAGUIDs - if enabled, you can allow or block specific authenticator models by AAGUID

For example, you might create:
- Default passkey profile - no attestation, device-bound and synced, no AAGUID restrictions (broadest access)
- Strict AAGUIDs and attestation - attestation enforced, device-bound only, specific hardware models allowed (for privileged accounts)
- Microsoft Authenticator - attestation enforced, device-bound, only Microsoft Authenticator AAGUIDs allowed
Enable and target tab: groups and profile assignment
The Enable and target tab is where you turn passkeys on and assign profiles to groups.
- Enable - toggle passkeys on for your tenant
- Include/Exclude - add target groups (or “All users”) and exclude groups as needed
- Passkey profiles - each included target group gets assigned one or more passkey profiles from a dropdown. This controls what types of passkeys users in that group can register.
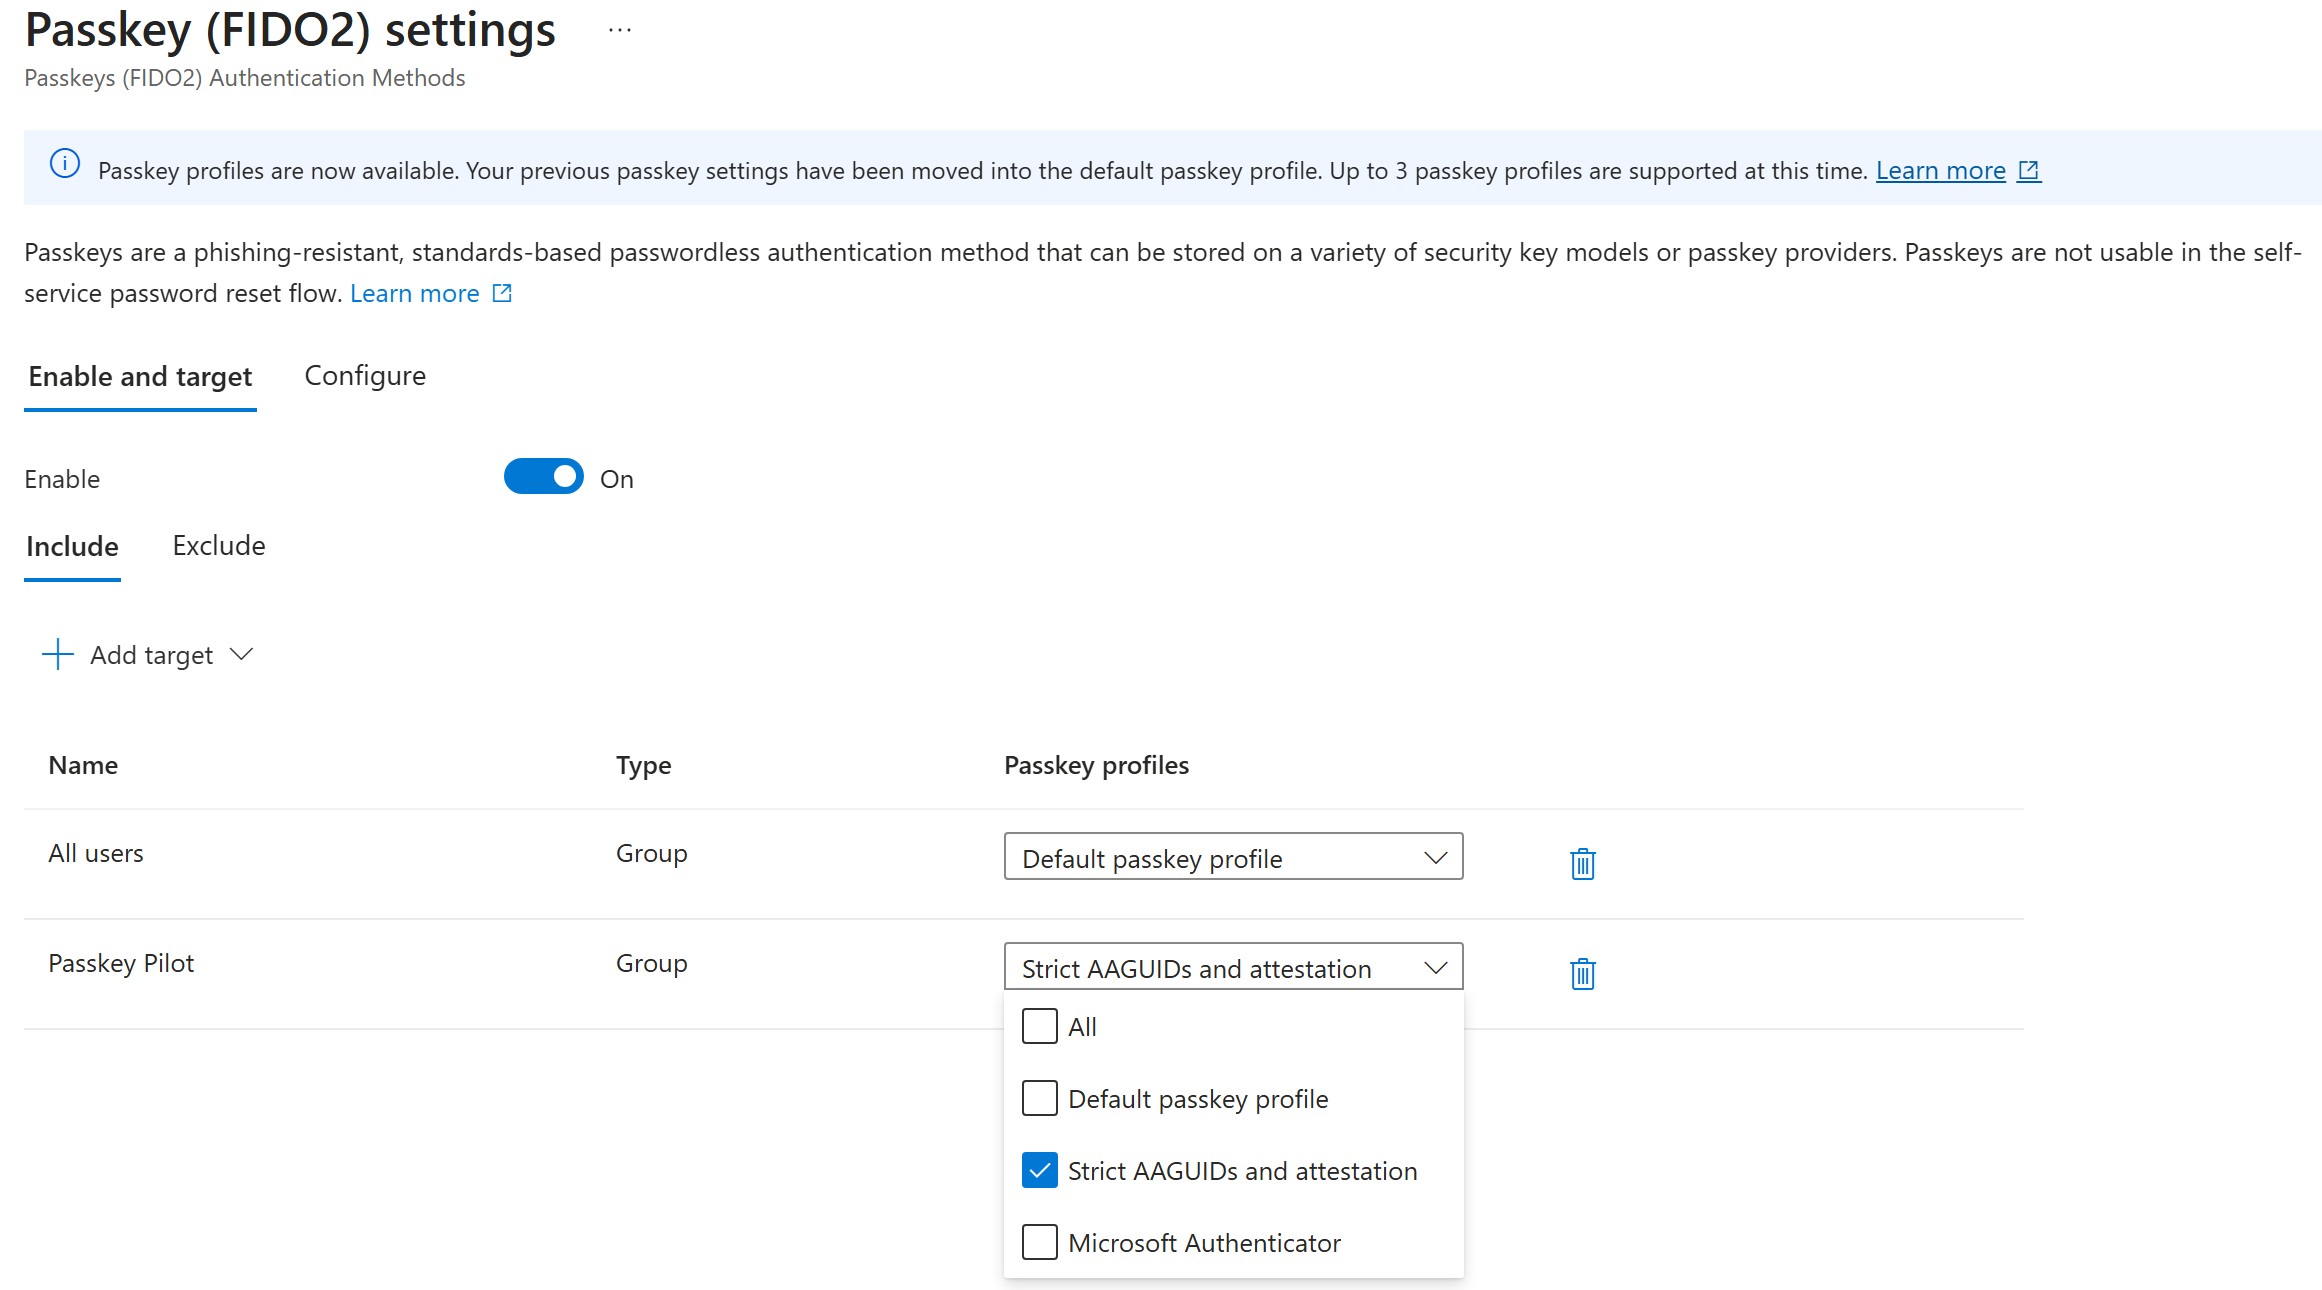
For example, you might target “All users” with the Default profile and target a “Passkey Pilot” group with the Strict profile. Users in the pilot group would be required to use hardware keys with attestation.
Configuring Microsoft Authenticator
The Microsoft Authenticator authentication method in Entra controls OTP and push notification behavior. For passkey-specific configuration, Microsoft Authenticator appears as an AAGUID option within the Passkey (FIDO2) passkey profiles.
To configure Authenticator for push and OTP:
- Go to Authentication methods > Microsoft Authenticator
- Enable it and target your groups
- Under Configure, set the Authentication mode (Push, Passwordless, or Any) and notification behavior
The Authenticator app must be version 6.8.0+ on Android and iOS for passkey support.
Configuring Windows Hello for Business
Windows Hello for Business is not configured through the Authentication methods blade. It’s managed through:
- Intune device configuration profiles (recommended for cloud-managed devices)
- Group Policy (for domain-joined devices)
In Entra, WHfB appears as a selectable method in Conditional Access authentication strengths - meaning you can require it in CA policies even though it’s configured elsewhere.
Getting started
If you’re just getting started, the minimum configuration is:
- Go to Passkey (FIDO2) and open the Configure tab
- Check Allow self-service set up
- Review the default passkey profile settings (no attestation, both passkey types, no AAGUID restriction is a reasonable starting point)
- Switch to the Enable and target tab, toggle Enable on, and add your pilot group with the default profile
- Ensure Temporary Access Pass is enabled as an authentication method - you’ll need it for recovery
- Test the registration flow yourself before inviting pilot users
Enabling Temporary Access Pass
A Temporary Access Pass (TAP) is the time-limited passcode your helpdesk will issue when a user loses their device, forgets their passkey, or is going through first-time onboarding. TAP has to be enabled as an authentication method before anyone can issue one.
You need the Authentication Policy Administrator role to edit this policy. (Issuing a TAP to a user is a separate action done by helpdesk with Authentication Administrator - see Issuing Temporary Access Passes for that side.)
Enable steps
- Go to Entra portal > Protection > Authentication methods > Policies
- Select Temporary Access Pass
- Click Enable and add the groups who should be able to sign in with a TAP (typically all users, possibly excluding break-glass accounts)
- Save
Configure policy defaults
Under the Configure tab, set organization-wide defaults. These become the guardrails your helpdesk operates within.
| Setting | Recommended starting value | Notes |
|---|---|---|
| Minimum lifetime | 1 hour | Matches the one-time device-loss recovery window |
| Maximum lifetime | 8 hours | Allows onboarding scenarios without letting TAPs linger too long |
| Default lifetime | 1 hour | Short by default; helpdesk can lengthen per issuance up to the maximum |
| One-time use | True | Forces single-use TAPs so an intercepted code can’t be replayed |
| Length | 8 | Microsoft’s default; 8-48 are supported |
You can tighten these later once you see how helpdesk actually uses TAPs. Start restrictive.
Scope to the helpdesk role
TAP issuance is sensitive - anyone who can issue a TAP can effectively become another user. Limit who holds Authentication Administrator:
- Assign the role to a dedicated helpdesk group, not individuals
- For least privilege, create a custom role that grants only
microsoft.directory/users/authenticationMethods/createand assign that instead - Review the assignment list quarterly
See Microsoft’s Configure a Temporary Access Pass doc for the full policy reference and known issues.
Stricter profiles (attestation, AAGUID restrictions) can be added later and assigned to privileged groups. See Attestation and AAGUIDs for that setup.