A Temporary Access Pass (TAP) is a time-limited passcode that lets a user sign in when they can’t use their passkey. It’s the main recovery mechanism when someone loses their device or gets locked out.
Before you can issue TAPs
Your IT admin must have TAP enabled as an authentication method in Entra. If you try to issue one and the option isn’t available, contact your admin team and point them at Enabling Temporary Access Pass for the config steps.
How to issue a TAP
Prerequisites
- You need at least the Authentication Administrator role in Entra (or a custom role with
microsoft.directory/users/authenticationMethods/createpermission). This is Microsoft’s documented minimum for issuing a TAP to non-admin users; for privileged users you need Privileged Authentication Administrator. Source: Configure a Temporary Access Pass. - If giving helpdesk staff the full Authentication Administrator role feels broader than you want, the custom-role approach above is the least-privilege path - it grants only TAP issuance (and other auth-method management on users) without the rest of Authentication Administrator.
- You have verified the user’s identity
Step-by-step
- Go to Entra portal > Users
- Search for and select the user
- Click Authentication methods in the left menu
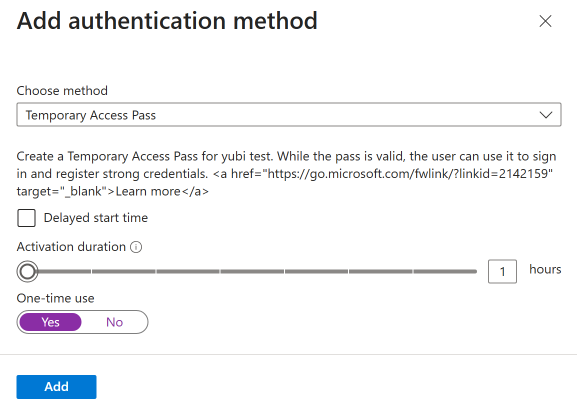
- Click + Add authentication method
- Select Temporary Access Pass
- Configure the settings:
- Start time: defaults to now (use this unless the user needs it later)
- Lifetime (hours): how long the TAP is valid
- One-time use: whether the TAP can be used once or multiple times within its lifetime
- Click Add
- Copy the TAP immediately - it’s shown only once
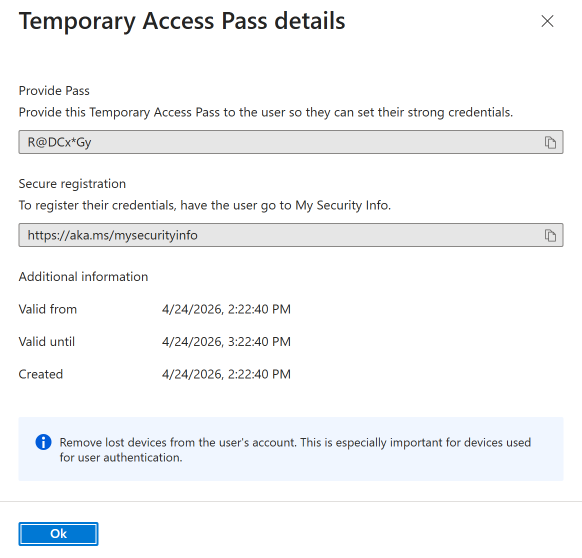
Delivering the TAP to the user
Secure delivery is critical. If an attacker intercepts the TAP, they can sign in and register their own passkey.
Recommended delivery methods (in order of preference):
- Read it over the phone during the verified call (best for remote users)
- In person - show the screen or hand them a printout (best for on-site users)
- Encrypted message via a pre-established secure channel
Never send a TAP via:
- Unverified email (the user’s account is compromised if they lost their device)
- SMS to an unverified phone number
- Slack/Teams message to a session you can’t confirm is legitimate
TAP settings guidance
Lifetime (duration)
| Scenario | Recommended lifetime |
|---|---|
| Device loss recovery | 1 hour |
| New employee onboarding (first passkey setup) | 8 hours |
| Scheduled device replacement | 2 hours |
| Troubleshooting (user will try multiple times) | 2 hours |
Keep it as short as practical. A longer TAP is a longer window of vulnerability.
One-time use vs multi-use
One-time use (recommended for most scenarios):
- TAP works for a single sign-in, then expires regardless of remaining lifetime
- Best for device loss recovery where the user just needs to sign in once to register a new passkey
- Limits damage if the TAP is intercepted
Multi-use:
- TAP can be used for multiple sign-ins within its lifetime
- Useful for onboarding when the user needs to sign in to multiple services to complete setup
- Use with caution - each additional use is an additional risk window
Organization-wide TAP policy
Your IT admin can set default TAP parameters at the policy level:
- Minimum lifetime: prevents helpdesk from issuing TAPs that are too short to be useful
- Maximum lifetime: prevents excessively long TAPs
- Default one-time use: organization’s default setting
These guardrails help maintain consistency even when different helpdesk staff issue TAPs.
What the user does with the TAP
- Go to https://mysignins.microsoft.com/security-info
- At the sign-in page, enter their email address
- When prompted for authentication, enter the TAP
- Once signed in, immediately register a new passkey
- Test the new passkey by signing out and back in
- The TAP expires (if one-time use) or can be left to expire naturally
Revoking a TAP
If you issued a TAP and need to revoke it (user didn’t need it, or you suspect compromise):
- Go to Entra portal > Users > [user] > Authentication methods
- Find the Temporary Access Pass in the list
- Click Delete
The TAP becomes immediately unusable.
Logging and auditing
Every TAP issuance is logged in the Entra audit log. For security reviews, you can report on:
- Who issued the TAP (helpdesk agent)
- Who the TAP was issued for (user)
- When it was issued and when it was used
- Whether it was one-time or multi-use
If your organization requires approval workflows for TAP issuance, consider building a process around this - even a simple Teams/Slack approval from a team lead before issuing to high-risk accounts.